Better iOS projects: Resizing iOS App Icons
In the series “Better iOS Projects”, we have a look at the various tools and environments that are useful to have more convenient and efficient handling of iOS Projects.
Alexander Klauer
Why we need a better app icon resizer for iOS
Resizing app icons for the various sizes Xcode requires might sound like a solved problem at first sight. There are dozens of tools that fulfill this purpose, however, most of them have one or more of the following drawbacks:
- They are GUI tools that can't be automated.
- They use dependencies (e.g. ImageMagic) and thus aren't as light and fast as you want them to be. Also, dependencies can always break.
- They don't create the folder structure and JSON files that Xcode needs to automatically recognize the icons.
- If you have an app that supports white-labeling, generating the various app icon sizes manually using a GUI tool becomes very tedious.
We didn't find any tool that didn't have these disadvantages, so we developed a simple one by ourselves. It's called "Swift AppIconResizer" and is published on Github under an open-source Apache 2.0 license.
It renders a given app icon png file into the different sizes Xcode needs for iOS projects. It also generates the required folder structure and JSON files.
Installation
Very easy with Mint
mint install num42/icon-resizer-swiftUsage
Let's say we develop an app for the iPhone and iPad. We have an app icon as a 2000x2000 pixel PNG
inputIcon.png and want to render it into all the sizes required by Xcode:
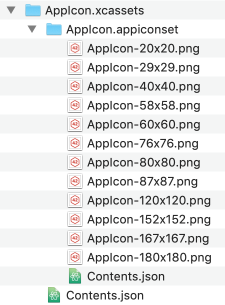
mint run icon-resizer-swift icon-resizer-swift --devices iphone,ipad inputIcon.pngDone. Here we see what the tool created for us in the current directory:

But AppIconResizer Swift is even more powerful than that. Let's say you want a badge badge.png
over your app icon indicating the installed instance of the app is for debugging. Just use
mint run icon-resizer-swift icon-resizer-swift --devices iphone,ipad --badge badge.png inputIcon.png
Here's a full list of options and arguments you can use with AppIconResizer Swift:
Options:
- --devices: Devices are
iphone,ipad,watch,ios-marketingandallfor all iOS resolutions. Multiple devices need to be separated by a comma. When not given, all resolutions get written. - --badge: Enables you to specify a path to a badge image, which will be rendered on top of the app icon (e.g. a "Debug" badge).
- --targetPath: The path that the xcassets folder structure and app icons will be written to. If no path is given by the user, icons are written into the current path.
Arguments:
- inputPath: Path to the input app icon file.
Under the hood: Using CGImage to resize images
To avoid using unnecessary dependencies we use Core Graphics very own CGImage.
We wrote an extension to CGImage that resizes a given CGImage into a given
CGSize:
func resize(to newSize: CGSize, badgedBy badge: CGImage? = nil) -> CGImage?First, we need to set a CGContext, which represents a Quartz 2D drawing destination.
guard let context = CGContext(
        data: nil,
        width: height,
        height: height,
        bitsPerComponent: self.bitsPerComponent,
        bytesPerRow: self.bytesPerRow,
        space: colorSpace,
        bitmapInfo: CGImageAlphaInfo.noneSkipFirst.rawValue
        ) else {
            return nil
    }
Very important for our tool: Set bitmapInfo to CGImageAlphaInfo.noneSkipFirst.rawValue.
This removes the alpha channel (transparency) from the image which is necessary so that our old chap AppStore
Connect accepts the icons.
Now we define a rectangle in which we want to draw (with input size) and draw the input image in that rectangle:
let rect = CGRect(x: 0, y: 0, width: height, height: height)
    context.draw(self, in: rect)
If we have a badge, we render it on top of the current context:
if let badge = badge {
        context.draw(badge, in: rect)
    }
Finally, we create a CGImage from our current context and return it:
return context.makeImage()We'd love to see you try out our tool and get into contact with us using issues and PR's on GitHub.
Acknowledgments
Thanks, as always, to Melanie Kloss for the great banner image.